Thanks to wikileaks, HTTPS Everywhere, and Let’s Encrypt, adoption of encryption (HTTPS) has skyrocketed in the past couple of years. According to the Google Transparency Report, they are seeing as much as 90%+ adoption with traffic headed to google:

While I love my privacy and fully support end to end encryption, encryption, specifically TLS 1.2 (with PFS) and above, straight up blinds me from a packet capture perspective. When a destination website support TLS 1.2 or greater, I am no longer able to record traffic, open wireshark and see what is going on past L4.

Troubleshooting the web in todays world without application layer data (L7) is straight up useless. Wireshark has become a tool to validate connectivity; source/destination port/protocol–lame. If you are a network monkey, I am sure you are thrilled with that level of visibility but trust there is much more going on at L7. Today, most people actually rely on headers captures or Fiddler to see what is going on at L7 but let me tell you, I miss wireshark.
Spoiler alert, you can decrypt TLS with PFS (ECC keys) and it doesn’t require MiTM:
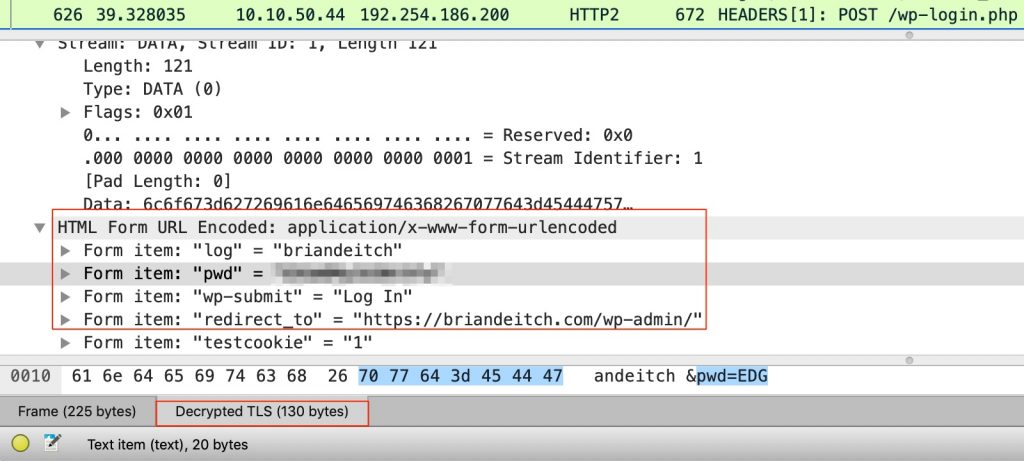
Yup, that’s a pcap opened in wireshark when I logged into the admin portal of this blog. And for what it’s worth, SSL Labs gives this blog an A+ for security so you have piece of mind that my capture wasn’t picking up clear text traffic. Note the form items “log” and “pwd”; that’s the username/password combination I used to log in. But also notice Decrypted TLS (130 bytes) as well
So how can I do this?
I would love to tell you that this is something new and I am the first to blog about it but sadly it’s been around since 2014/2015-ish. However I am taking the time to write this up because a majority of the instructions out there are garbage or outdated.
While this is written for MacOS, the reality is, it will work for Windows and Linux as well as long as the browser is either Chrome or Firefox. Apparently both Chrome and Firefox can be configured to dump TLS session keys so you can replay/decrypt traffic in wireshark, cool right? Let’s set it up:
Step 1: Set the environment variable for the session keys:
mbp:bdeitch$ export SSLKEYLOGFILE="/var/log/sslkeylog.log"
mbp:bdeitch$ echo $SSLKEYLOGFILE
/var/log/sslkeylog.log
Step 2: Create the file and set permissions
mbp:bdeitch$ sudo touch /var/log/sslkeylog.log
mbp:bdeitch$ sudo chmod 777 /var/log/sslkeylog.log
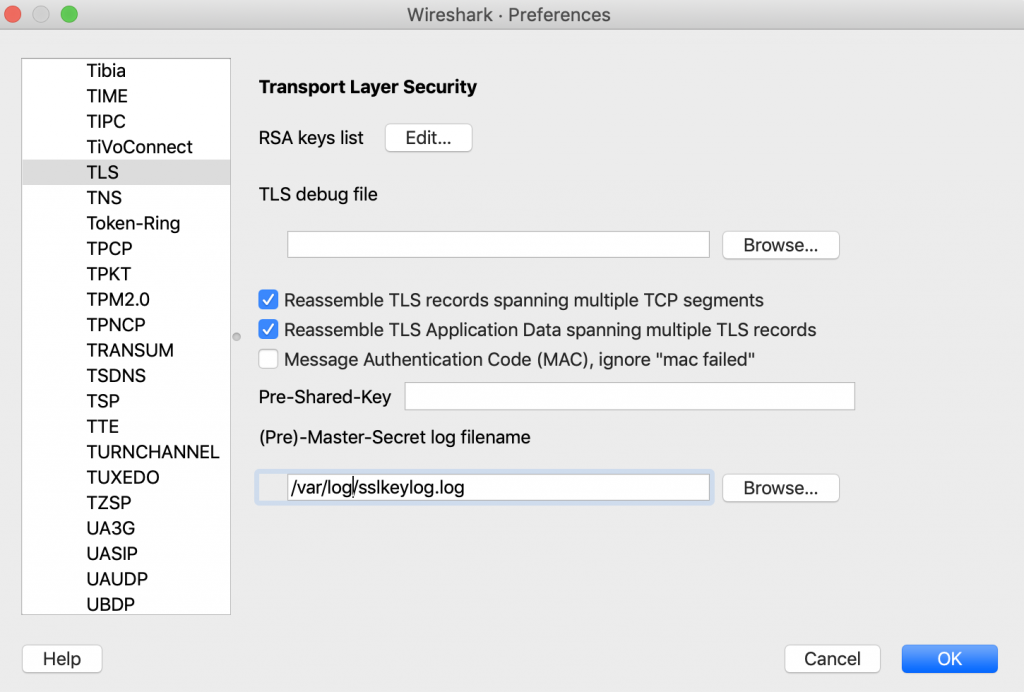
Step 3: Configure wireshark to use the session key log.
- Open wireshark
- Navigate to Wireshark Menu >> Preferences >> Expand Protocols and click TLS
- Add the log file to the (Pre)-Master-Secret log filename, click OK and close wireshark:
Step 4: Make sure Firefox or Chrome is NOT not running and jump back into terminal. Run the following commands to open Chrome or Firefox (dealers choice) along with wireshark.
For Chrome:
mbp:bdeitch$ open -a /Applications/Google\ Chrome.app/
mbp:bdeitch$ wireshark
For Firefox:
mbp:bdeitch$ open -a /Applications/Firefox.app/
mbp:bdeitch$ wireshark
Step 5: Start your capture on wireshark and browse to a secure website, in my case I visited the admin portal for the blog and logged in. Stop your capture.
Step 6: In wireshark, look for some L7 data. Navigate to Edit >> Find Packet. Change the display filter from Display filter to String:

Then change Packet list to Packet details:

Next, search for any text that would only be in L7. For giggles, let’s see if we can find the login event along with my username and password. I know the form uses the item “pwd” so we can search for that:
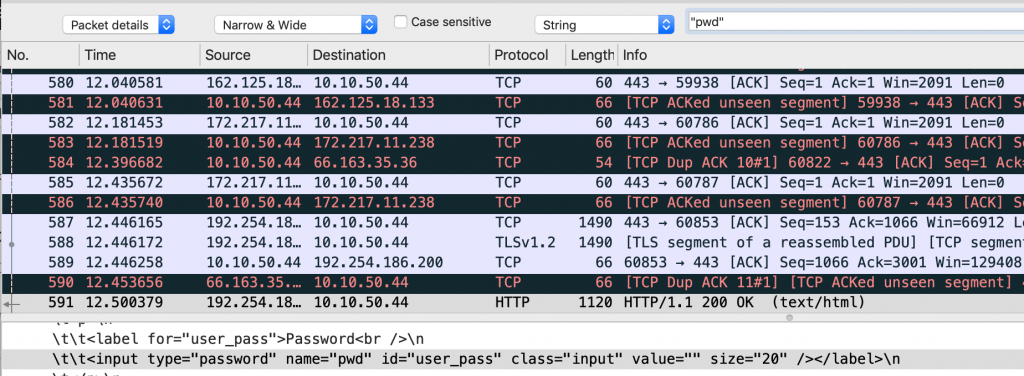
Getting close, that is the actual login page. Let’s click Find again and see what we can find:
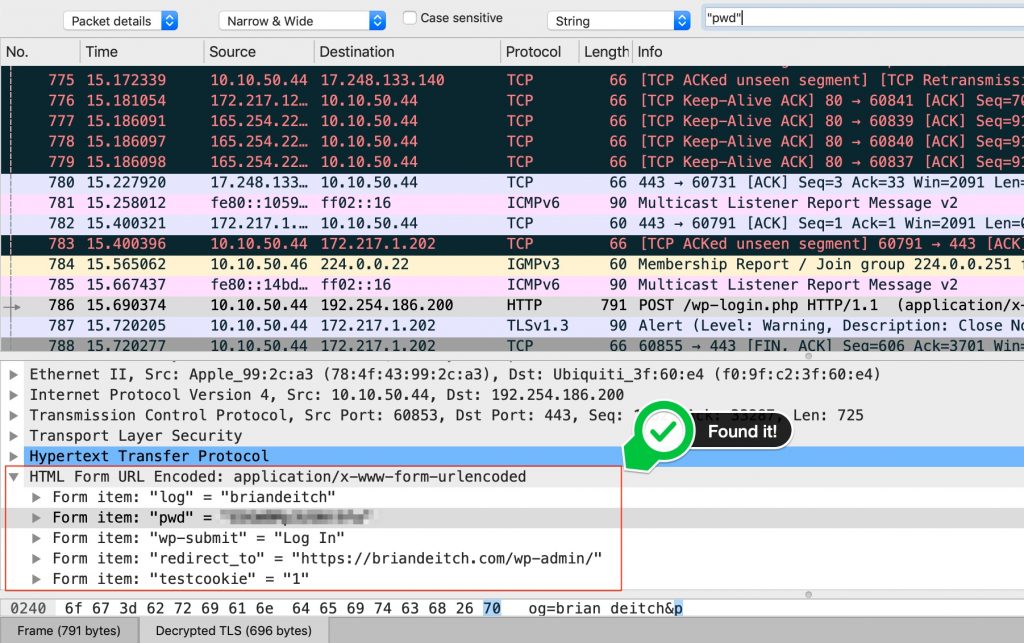
And just like that, you have the ability to use wireshark the way God intended.

Gotchas
When I first started doing this, I was having an absolute shit time getting things to work. Learn from my mistakes!
- Just because you set the environment variable doesn’t mean the file is automatically created. Hence the Step 2 above. You may or may not need the chmod command, I needed it as the path, /var/log/, needed elevated permissions.
- Launch the browser from the CLI!
- Launch wireshark from the CLI!
- If you are unable to decrypt, open the log file and see if you have entries for CLIENT_RANDOM. If it is missing, you likely have an antivirus software running that is doing some type of web proxy. I ran into this issue with Avast. Once I disabled it, the CLIENT_RANDOM keys were being saved.
This was tested on/using the following:
- MacOS Mojave 10.14.5
- Chrome Version 75.0.3770.100 (Official Build) (64-bit)
- Mozilla Firefox Quantum 68.0
- Wireshark Version 3.0.2
Regards,
BD

